


INTRODUCTION
..
LARS is a fully balanced power amplifier that operates in class A. It has a linear construction throughout the amplifier. No negative feedback is used. LARS is configured as two monoblock amplifiers. Each amplifier has two inputs, one balanced XLR and one unbalanced RCA connector. The XLR and RCA connectors and the output speaker connectors are located on the back of each amplifier. There is a power switch on the back of each amplifier.
SAFETY INFORMATION
..
When using an electrical appliance, basic precautions must always be followed. Read these safety instructions carefully before installing LARS and connecting it to your system and an electrical supply.
DANGER! Always make sure that you only use tubes for which LARS has been configured. If you are uncertain contact your dealer before installing the tubes. If the tubes and the amplifier configuration are not matched, the tubes will be seriously damaged. The amplifiers may also be seriously damaged. Using the wrong set of tubes will void the warranty.
DANGER! Risk of electric shock. Do not remove the top, back and/or the wood cover from the amplifiers. Only authorized service personnel should open the amplifiers for repairs and maintenance work. Not following these safety precautions may be lethal. Any repair and maintenance work carried out by non-authorized ser- vice personnel will void the warranty.
DANGER! The tubes operate at high temperatures and can cause burns if touched! Do not touch the tubes and/ or surrounding areas while the amplifiers are in use and for some time after they have been turned off. Always let the tubes cool down thoroughly and disconnect the power cords before touching or removing the tubes. Always keep the amplifiers out of reach of children and animals.
DANGER! The amplifiers generate much heat! Adequate ventilation must be provided for. Do not place anything on top of and/or too close to the amplifiers that may restrict the airflow through the ventilation.
DANGER! Risk of electric shock! Do not expose the amplifiers to any kind of liquid.
IMPORTANT! Always turn off the amplifiers, disconnect the power cords and let the tubes cool down thoroughly before cleaning or dusting off the outside of the amplifiers.
IMPORTANT! If the amplifiers are moved to a new location, they should be left off for some time in order to ad- just to the temperature in the new environment, before further use of the amplifiers.
UNPACKING
..
LARS is shipped in two packages, one for each amplifier. Be careful when unpacking the amplifiers and the other items included. Use gloves (included) when removing the amplifiers and the outer panels from the boxes to avoid leaving fingerprints on the surfaces. Be aware that the amplifiers are quite heavy and that they have a high centre of gravity. Lift each amplifier by holding it on the underside in order to relieve the wood cover from the load.
What’s included in the packaging?
• 2 Amplifiers
• 4 Glass panels - 2 for each amplifier
• 2 Set of tubes - 1 set of 7 tubes for each amplifier - 2 power cords - 1 for each amplifier
• 1 Pair of gloves
• 4 Fuses
• 1 Hex key
• 1 Polishing cloth
• 1 User manual and warranty
If any of the above items are missing, contact the dealer from whom you bought LARS. We recommend that you keep the original packaging, if you should need to transport the amplifiers.
ASSEMBLY
..
Before mounting the panels and installing the tubes, move the amplifiers to the place where you plan to set up your system. Make sure that the area is properly ventilated and that the airflow around the amplifiers is not prevented. Do not place the amplifiers in a humid environment or close to a heat source, e.g. a radiator or a fireplace. Do not expose the amplifiers to direct sunlight.
Unpack the panels carefully. Use gloves to avoid leaving fingerprints on the surface. We recommend that you ask for assistance when mounting the back panel.
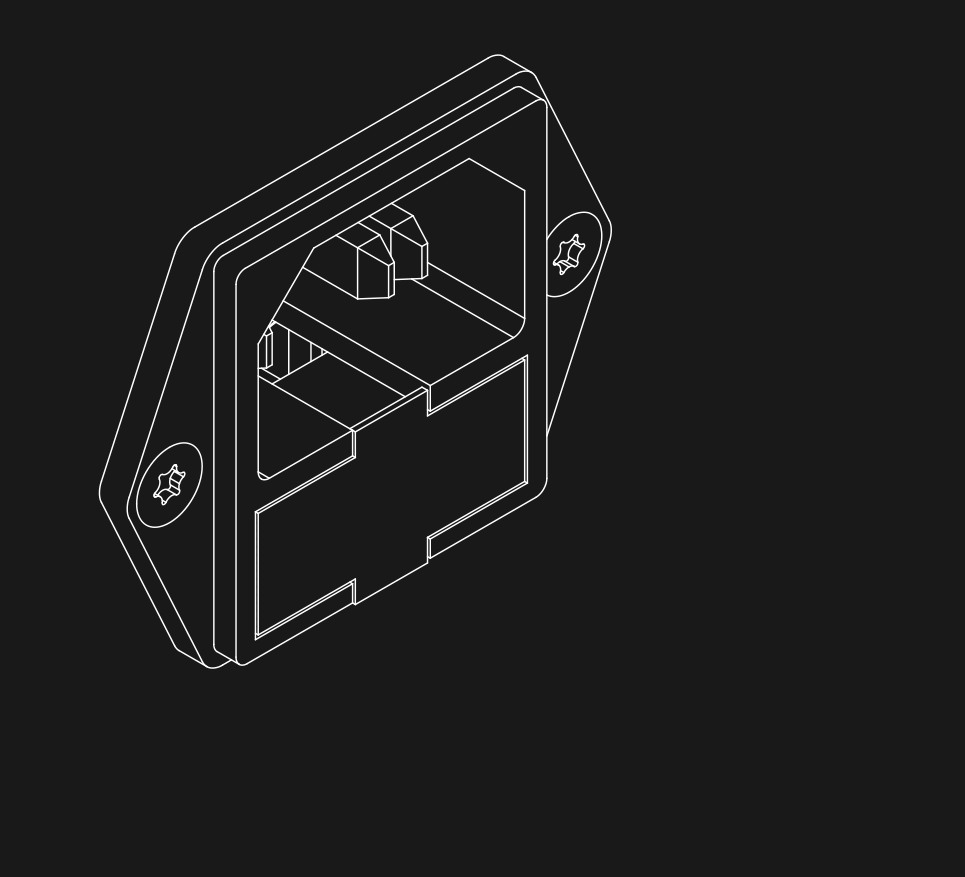
Mounting the back panel
The back panel should be mounted before the tubes are installed.
1. Start by removing the 4 screws and washers as shown in the picture below.
2. Mount the back panel and fix it with the screws and washers.
Installing the tubes
LARS is shipped without the tubes installed. Each amplifier is operated by seven tubes. All tubes must be installed to operate the amplifiers. LARS comes with the following tubes:
• 2 x 300B-XLS
• 2 x 6V6GT
• 1 x 6188
• 2 x GZ34 (or 5AR4)
The tube packages are numbered and the corresponding sockets on the amplifiers are marked on the illustra- tion below. Install the tubes with a gentle but firm pressure in their respective socket. Be aware that it is pos- sible to install the tubes incorrectly. Doing so may seriously damage the amplifiers and the tubes, and will void the warranty.
DANGER! Always make sure that you only use tubes for which LARS has been configured. If you are uncertain contact your dealer before installing the tubes. If the tubes and the amplifier configuration are not matched, the tubes will be seriously damaged. The amplifiers may also be seriously damaged. Using the wrong set of tubes will void the warranty.
IMPORTANT! Read the safety instructions before installing the tubes.
1. Unwrap the tubes carefully from their packaging. Use gloves to avoid leaving fingerprints on the glass envelopes.
2. Install the tubes in the order shown in the illustration below.
3. When all tubes are installed, check carefully that they are positioned correctly.
Tube break-in
The tubes, similar to components inside a tube amplifier, work better after a break-in time. At Engström we burn in the tubes before we ship LARS. We do this to give you the best experience from the start. However, you will almost certainly notice even further improvement of the tubes after you have used LARS for some time.
Mounting the front panel
Be careful when mounting the front panel to avoid damaging the tubes.
1. Mount the front panel by sliding it in from the front of the amplifiers as shown in the illustration below.
2. Make sure that the panel rests on all four feet.
3. Fix the front panel with the lock screw found on the back of the amplifier, see illustration below.
• Turn the upper screw clockwise until the panel is safely fixed against the feet.
• Turn the lower screw anti-clockwise to lock the screw.
CONNECTIONS
..
All connectors are located on the backside of each amplifier. See illustration below.
How to connect
1. Connect the loudspeakers and make sure that the polarity is correct. Connect the loudspeakers before the power cords are connected, to secure that the amplifiers are turned on with the correct load.
2. Connect the power cords, one for each amplifier, and then connect the power cords to a wall socket. LARS must be connected to a grounded outlet in order for filters and screening to work correctly.
3. Connect the signal cords. Each amplifier has two line inputs. One balanced XLR connector and one unbalanced RCA connector. If the signal cord has an unbalanced RCA connector, push the Unbalanced button on the back of each amplifier.
The signal source should preferably have low output impedance. 600 ohms gives the lowest distortion.
IMPORTANT! Always turn off the power before connecting or disconnecting any sources to the amplifiers.
The Unbalanced button
The unbalanced button activates the balanced XLR or the unbalanced RCA input connectors. If no sound comes from your system, the reason may be that the input connector that you are using is not activated.
Activate it by pushing the Unbalanced button once.
Loudspeaker impedance
To get the best performance, check the impedance of the speakers and use the Output impedance selector on the back of each amplifier to select the setting for 4, 8 or 16 ohm speakers. If the speaker impedance falls between the fixed settings of LARS, the lower impedance should be selected. Example, if the speaker impedance is 6, select 4 on LARS.
The GND (Ground) switch
The GND switch is used to diminish the hum that may occur when a source is connected to the unbalanced RCA connector and the source’s power cord is not connected to a grounded outlet. Push the switch upwards to its GND position if this is the case.
High voltage output sources
If a source, e.g. a CD player, has a high output voltage, more than 1-2V, push the -8db button on the back of each amplifier to dampen the sensitivity and the hum and noise that may come from the source. Most sources have a low output voltage, but some brands have a 5-voltage output or more.
The GND (Ground) connector
If a source has a separate ground cord, it can be connected to the GND connector.
Turning the amplifier on/off
Check that all connections are correct before turning on the power. Each amplifier has a power switch located on the back. The amplifiers need a couple of minutes to warm up before they are ready to run.
If the amplifiers have been turned off, they should be left off for a few minutes before turning on the power again. This ensures that the tubes warm up in the correct sequence.
MAINTENANCE
..
Important! Always turn off the amplifiers, disconnect the power cords and let the tubes cool down thoroughly before cleaning or dusting off the outside of the amplifiers.
The outer panels can be removed to be cleaned, or to remove dust from the amplifier. The panels can be washed in warm water with a mild detergent. The wooden case is finished with normal furniture lacquer, and can be wiped off with polish when required. Fingerprints on the metal-plated surfaces can be removed using a soft non-fluffy cloth.
DANGER! Risk of electric shock. Do not remove the top, back and/or the wood cover from the amplifiers. Only authorized service personnel should open the amplifiers for repairs and maintenance work. Not following these safety precautions may be lethal. Any repair and maintenance work carried out by non-authorized ser- vice personnel will void the warranty.
Mains fuses
The two mains fuses are located close to the power switches and can easily be replaced if needed.
IMPORTANT! Only use 250V fuses.
IMPORTANT! Always turn off the amplifiers, disconnect the power cords and let the amplifiers cool down thoroughly before replacing the tubes, cleaning or dusting off the outside of the amplifiers.
Removing and replacing the fuses
1. Turn off the amplifiers, disconnect the power cords and let the amplifiers cool down thoroughly.
2. Open the fuse box gently by pulling it straight out (see illustration below).
3. Remove the old fuses and check if they are broken.
4. Replace the broken fuse and insert the new fuse and close the box.
Tube replacement
The tubes have a lifetime of 5 to 10 years when the amplifiers are used a few hours per day. When replacing the tubes, all tubes of the same type should be replaced at the same time.
IMPORTANT! Read the safety instructions before replacing the tubes.
DANGER! Always make sure that you only use tubes for which LARS has been configured. If you are uncertain contact your dealer before installing the tubes. If the tubes and the amplifier configuration are not matched, the tubes will be seriously damaged. The amplifiers may also be seriously damaged. Using the wrong set of tubes will void the warranty.
Removing and replacing the tubes
1. Turn off the amplifiers, disconnect the power cords and let the tubes cool down thoroughly.
2. Remove the front panel.
3. Remove the tubes by pulling them straight up gently but firmly.
4. To install the new tubes and to mount the front panel, follow the descriptions under the headings “Installing the tubes” and “Mounting the front panel” above.